www.plumberx.com How to solder copper pipe and re-pipe home. Well how did this come about? I Felt that there's was a lot of people out there that like Diy projects and they do have the skill, and some of use have more time then we have money, but they all have one thing in common is they just need a little encouragement and close up on know how. And in these video I provide just that. Every shot is close up and personal. I made these videos with the mind set of , How would I want to learn by watching a videos, and this these are the results. Close up shot's of what is really going on. You know let me see move to the side man. I don't want to see you I want to see what your doing. I can't learn any thing looking at you show me that work please. Thank you! J Yep that's just how I feel when I watch a video and the guy in the videos just wants to show himself and talk and talk and talk and close to the end he show a little shot of the work. Thanks a lot Pal for wasting my time. Now in these how to solder copper pipe and re-pipe home you we learn things like How to solder copper pipe, How to keep from burning things around you, How to hang copper pipe to floor joist, how to prepare the copper pipe and pipe fitting to be soldered, Soldering copper pipe and fitting in the horizontal position, how to solder Dielectric unions on water heater with out burning the inserts, and much more. Soldering copper pipe is not as hard as it may seem with a little know how and practice you can ...
Wednesday, December 28, 2011
Sunday, December 25, 2011
Justrite 7250120 AccuFlow 5 Gallon, 11.75" OD x 17.50" H Galvanized Steel Type II Red Safety Can With 5/8" Flexible Spout
!±8± Justrite 7250120 AccuFlow 5 Gallon, 11.75" OD x 17.50" H Galvanized Steel Type II Red Safety Can With 5/8" Flexible Spout

Brand : Justrite | Rate :  | Price : $64.71
Post Date : Dec 25, 2011 10:09:31 | Usually ships in 24 hours

| Price : $64.71Post Date : Dec 25, 2011 10:09:31 | Usually ships in 24 hours
- Large ID zone permits user labeling of contents to avoid misuse
- Stainless steel flame arrester for exceptional corrosion protection - reliably dissipates heat to prevent flashback ignition; Long 3-1/2" (88mm) length arrester allows safe, secure placement of gas nozzle
- Gasoline, Gas-Oily Mixture, Kerosine, Diesel
- Ergonomic offset fill port with comfort lift lever makes filling easier than ever Easy-to-use Safe-Squeeze trigger for accurate control of liquid flow
- Self-closing lid controls vapors and spills
More Specification..!!
Justrite 7250120 AccuFlow 5 Gallon, 11.75" OD x 17.50" H Galvanized Steel Type II Red Safety Can With 5/8" Flexible Spout
Tuesday, December 20, 2011
Fix A Leaking Outside Water Faucet
Sometimes you run across a leaking spicket that is on the outside of the house. If you live in the city, this could increase your water bill not by much but still an increase. If you live out in the country this might increase the electric bill because the well keeps on running to provide that water.
Depending on the type of spicket that you have will depend on the fix. If you have a standard compression spicket, which usually has the round metal handle on it, the leak may be coming from the handle stem, if so all you have to do it tighten the packing nut that is buy the handle. To do this just take a wrench and tight the packing nut around the stem. Now if that doesn't fix it, and the handle is still leaking, or that the leak is coming from the spot, we are going to have to take the take the spicket apart.
To do this we want to start off by shutting off the water to the spicket. This is done usually in the basement or crawl space. Now if your house is on a concrete slab there is one of two things you can do. One is shut the water main off to the entire house, or if you are lucky and the plumbers installed a shut off for that spicket, which they most likely didn't do, you can turn that off. The same goes if you don't have a shut off in the basement for the spicket, you have to shut off the main to the house. Now the main to the house will have a large meter on it known as, you got it the water meter. There will be some sort of valve near it. Warning! DON'T SHUT THE VALVE OFF THAT GOES INTO THE METER. This will get you into a lot of trouble it tampered with. The valve that we want is on the out of the water meter.
With the water shut off, its time to get to work. Now go outside and turn and open the valve to release and water that is in the pipes from the inside valve to the spicket. If you had to shut the main off go every fixture in the house and open them to release the water and the go to the spicket and open it. This will remove any water from the house and then you don't have to work with water coming at you by surprise.
Now, if the stem is leaking we are going to want to remove that part from the spicket. To do that, we are going to need an adjustable wrench. Behind that packing nut there is a spot that you can place an adjustable wrench and unscrew the assembly. Completely unscrew that packing assembly and remove it from the spicket. Now we are going to want to get to the packing nut washer. To do this we need to unscrew the handle on the assembly. There should be a nut or screw on top of the handle that you can unscrew. Unscrew it and remove the handle.
Next you are going to want to unscrew and remove the packing nut. Inside the nut you are going to find some type of washer, either a Rubber packing washer or graphite packing string. Remove either and replace with a new matching one. Now if you can't find a matching washer for the packing nut, you can use graphite sting. Wrap the string around the stem and the push the packing washer over it and tighten it down. You can do this by using a flat blade screw driver. The reverse the steps, first by reinstalling the packing nut, put the handle on the assembly, put the assembly back in to the spicket, and tighten.
Now if the spicket was leaking from the spout, all beginning steps are the same to get the assembly out of the spicket. Then you are going to want to replace the compression washer that is on the bottom of the assembly. Unscrew the nut that holds it in place and replace the washer with it exact match size and shape. Re-screw the screw back on to the assembly to hold the washer. Then reinstall the assembly back into the spicket. With the spicket reinstalled it is safe to turn the water back on. Make sure that all the faucets in the house that you opened are closed first.
Saturday, December 10, 2011
Make Money Solving Plumbing Problems
Owners or tenants pay you to solve plumbing problems in their apartments or homes. Since this is an emergency type service, you should be able to make money without much trouble. People seem to have leaking water, and/or stopped up drains quite often. With the right kind of knowledge, you can easily solve most of these problems. (This is article #4 in a series of emergency handyman services.)
Requirements
This business idea is best suited for people who are physically fit and enjoy working with their hands. You must be able to locate and remedy common plumbing problems. If needed, you can buy how-to manuals at most plumbing or building products stores.
You should own a pickup truck or van to haul equipment, materials, supplies, and trash. You need to own or purchase the equipment and protective gear required for this activity. You should set up a home office with the basic office equipment and supplies.
Getting customers
Use a simple classified advertisement in the local newspaper or on craigslist.org to get customers. Also, advertise in any property owner's newsletter.
Preliminary job activities
After arriving at the job site and greeting the customer, inspect the water leak or stopped up drain. Determine if you need to purchase any plumbing fixtures, drainpipe, or water pipe. You should already have a supply of assorted drain traps, gaskets, screws, and washers for minor repairs.
The customer may be in a hurry and want you to work on a holiday, weekend, or at night to get the plumbing problem fixed.
You can use standard job bid forms to estimate your labor and the costs of materials and supplies. This bid should include the fees for any extra services to be performed, such as hauling away any large amounts of trash. If the customer accepts your bid, you both can sign the bid form.
Turn off the main water supply valve. Also, shut off any electricity or combustible gas to an affected water appliance.
Main job activities
Following are typical plumbing problems you may encounter and the procedures to take care of them.
Clogged aerator or showerhead -- The aerator is a device on the end of a faucet spout that mixes air with water to produce a gentle stream of water. A showerhead often is adjustable to allow different streams of water, such as a fine spray or a concentrated spray. You can unscrew either device from its spout and open it up to remove all the clogging particles inside it. Then screw the device back onto its spout.
Defective hot water tank -- If the tank itself is leaking it will have to be replaced. Sometimes a heating element on an electrical hot water tank burns out. In this case, only the heating element has to be replaced. If the hot water tank has to be replaced then the defective tank will have to be hauled to a suitable dumpsite. In most cases, a defective hot water tank should be repaired or replaced only by a licensed plumber. (Note: Draining, refilling, or replacing a hot water tank is a very delicate operation. Be sure you are fully qualified before attempting these procedures.)
Frozen water pipe --If the frozen water pipe is ruptured, turn off the main water shutoff valve. Then you will have to cut out the portion of the pipe that is split or ruptured. Place a water pail under this gap. Next heat the pipe beginning where the pipe was cut off and going both ways toward the rest of the pipe. After thawing out the pipe, you will have to replace the missing portion of the pipe. Then open a faucet and turn on the main water shutoff valve to verify that the pipe has been thawed out.
If the frozen water pipe is not ruptured, do not turn off the main water shutoff valve. Begin heating the pipe starting from an open faucet and going toward the portion of the pipe that appears to be frozen. Usually this will be where the pipe is exposed to cold air.
You can use any of the following heat sources to thaw out the pipe:
* Electric heat tape
* Heat lamp
* High-power air dryer
* Small portable heater
Do not use an open flame to thaw out a frozen water pipe. This may cause a fire.
Leaking bathtub or shower -- Any leaks from the showerhead or tub spout should be obvious from visual inspection immediately after use. You may be able to fix the leak by putting Teflon tape on the threaded pipe that supports the showerhead or tub spout. If the showerhead or tub spout is rusted out, you will have to replace it.
If the shower drain, or the bottom drain in a bathtub, is leaking as seen from water stains underneath it, you probably need to install a new gasket or plumbing putty between the drain flange and the shower or tub floor. If the side drain (overflow drain) in a bathtub is leaking as seen from water stains underneath it, you probably need to install a new gasket between the outside wall of the tub and the flange of the overflow drain.
If the seams in the bathtub wall or shower enclosure have opened, you will have to reattach the wallboard and/or apply new caulking. Also, you may need to renew the caulking between the bottom of the shower or bathtub wall, and the top edge of the bathtub or shower drain pan.
Another possible source of leaks is water spraying through the gaps where a shower curtain fails to butt firmly against the wall on either side. You can use adhesive caulk to attach plastic triangles to the top edges of the bathtub to close these gaps.
Leaking drainpipe or trap -- The two main causes of leaks from a drainpipe are a rusted or damaged pipe, or a worn-out gasket.
If there is no gasket at the source of the leak, then the drainpipe itself is probably damaged. You will have to replace that piece of the drainpipe. This drainpipe is usually either white thin-wall plastic, chromed metal, ABS black plastic, or galvanized steel.
If the drainpipe goes under the floor, you may have to get access to the crawl space or basement to locate the source of the leak.
When replacing a portion of a drainpipe that goes inside a larger pipe, be sure to allow for the "hidden" portion of the replacement drainpipe. Where different kinds of drainpipe are connected together, you'll need a compression nut and a new gasket for the connection.
Leaking faucet -- A standard faucet (or hose cock) is used for either cold water or hot water. Thus, two faucets are needed to deliver the desired temperature of water to a sink, washbasin, showerhead, or tub spout. A hose cock is a shutoff valve that allows the female end of a garden hose to be attached to its spout. It is used as a water supply for a clothes washer or a lawn sprinkler, or as a drain for a hot water tank.
The standard faucet (or hose cock) has a rubber washer that bears against a valve seat, the source of water. The washer is held in place by a screw that goes into the stem (spindle) of the handle.
A single-handle faucet controls the water temperature by mixing hot and cold water together. Depending on the manufacturer, these faucets use different devices to mix and control the flow of water. This device could be a cartridge, ceramic disc, or rotary ball with two rubber seats and springs. If this device is leaking, you will have to replace it.
Leaking toilet --If the toilet is a single piece, the leak will be where the toilet sits on the floor. You will have to unfasten the toilet from the floor, replace the wax ring, and re-fasten the toilet to the floor.
If the toilet has a separate water tank, the leak may be where the bottom of the water tank attaches to the top of the toilet bowl. If so, you will have either to carefully tighten the screws or replace the gaskets.
Leaking water appliance -- a water appliance refers to a dishwasher or clothes washer. The two main sources of leaks in a dishwasher are the hot water supply line and the drain line. You have to remove the kick plate of the dishwasher to get access to the underside of the dishwasher. While the dishwasher is running, you can inspect these two lines to see where the leak originates. To fix the problem, you probably need to tighten or replace the connection between the dishwasher and the water or drain line.
There could also be a leak where the other end of the hot water supply line goes into its shut off valve. If so, you probably need to tighten the connection or replace the washer.
A clothes washer is connected to the hot water and cold water supply with a pair of short hoses. These hoses are similar to a garden hose, but are stronger. You may have to tighten the connection or replace the washer. If the drain line connection to the clothes washer is leaking, you should tighten it or replace the washer.
Stopped up drainpipe or trap -- If the trap is blocked, you can simply unscrew it and dump out the water and any blocking material. Once the trap is cleaned out, any further blockage would be in the drainpipe after the trap. Remove the trap again and use an auger to clean out the drainpipe.
Stopped up toilet -- If the toilet bowl is overflowing, the blockage is either in the internal trap in the toilet, or in the drainpipe going from the base of the toilet to the sewer line. In either case, you probably need to use an auger to clear out the obstruction.
Final job activities
Turn the main water supply valve back on and turn on any electricity or combustible gas that was previously shut off. Check for any leaks or drain blockages. Inspect the premises to verify you have finished all required tasks. Remove all your equipment and supplies.
Collect your agreed upon fee from the customer. Haul large amounts of trash away, if part of your agreed upon services. (Remove small amounts of trash as a courtesy to your customer. You can haul it to a dumpsite later.)
Final thoughts
This business idea lets you make money while providing a needed service. You can start out as a part-time venture. Then, if the demand is sufficient, you might want to make it into a full-time venture.
Coupon Thermal Coffeemaker Cheap Mitsubishi 915p020010 Hot Tools Blow Dryers Best Quality
Justrite 7210120 AccuFlow 1 Gallon, Galvanized Steel Type II Red Safety Can With 5/8" Flexible Spout
!±8± Justrite 7210120 AccuFlow 1 Gallon, Galvanized Steel Type II Red Safety Can With 5/8" Flexible Spout

Brand : Justrite | Rate : | Price : $63.55
Post Date : Dec 10, 2011 16:15:05 | Usually ships in 24 hours
| Price : $63.55Post Date : Dec 10, 2011 16:15:05 | Usually ships in 24 hours
Justrite 7210120 AccuFlow 1 Gallon, Galvanized Steel Type II Red Safety Can With 5/8" Flexible Spout
- Large ID zone permits user labeling of contents to avoid misuse
- Stainless steel flame arrester for exceptional corrosion protection - reliably dissipates heat to prevent flashback ignition; Long 3-1/2" (88mm) length arrester allows safe, secure placement of gas nozzle
- Gasoline, Gas-Oily Mixture, Kerosine, Diesel
- Ergonomic offset fill port with comfort lift lever makes filling easier than ever Easy-to-use Safe-Squeeze trigger for accurate control of liquid flow
- Self-closing lid controls vapors and spills
More Specification..!!
Justrite 7210120 AccuFlow 1 Gallon, Galvanized Steel Type II Red Safety Can With 5/8" Flexible Spout
Wednesday, December 7, 2011
Guide to Stainless Steel Coolers
When you need to transport or store cool beverages for any period of time, a cooler can come in handy. Cooler come in all sizes, ranging from small handbag-style units to giant rolling coolers for camping trips. Unfortunately many of these coolers are quite bland in appearance, having only a white plastic exterior. Stainless steel coolers spice things up by using a true stainless steel exterior for function and great looks. The company Coleman invented the first steel cooler in the 1950's and they have been popular ever since. Through the decades, these coolers have evolved slightly but their function remains the same- to keep drinks and snacks cold when a refrigerator is not close at hand.
Stainless steel coolers feature real stainless steel on the outside. This not only looks good but provides a noticeable insulating effect. Sandwiched between the steel exterior and waterproof interior liner is insulating foam which keeps heat from entering. A set of industrial hinges and a rubber seal keep heat from entering the lid seams. Extra features like drink holders, metal stands and roller wheels can provide a helping hand. These coolers are rated at different sizes, usually in quarts. Users partially fill the cooler with ice and then deposit their perishable goods.
Coleman's 54 quart stainless steel cooler is a true work of art, featuring a full steel lid and base. The bottom is covered with black plastic to prevent the unit from sliding around. A 1/3 gallon steel jug is included for users to store beverages in. The durable steel latch is rust proof and works to keep the lid sealed tightly at all times. With this tight seal, melting ice has no chance of escaping. A drain at the bottom allows users to empty melted ice by tipping the unit over. The included liquid jug has a flip spout for easy sipping.
A company called Living Accents also makes a great stainless cooler that sits on a wheeled frame. This large 120 quart cooler has double top doors for easy access. The interior is made from tin, while the exterior is covered I stainless steel. The cooler sits on a specially designed metal frame that has caster wheels on the bottom. Since the unit becomes quite heavy when full, the wheels are provided to aid in transport. On the front is a handy bottle opener to open glass bottles quickly. A small cup holds used bottle caps until they can be disposed of.
Best Buy Home Lite Chainsaw Great Deals Yamaha Dgx530 Great Deals Windmills Pumping Water
Friday, December 2, 2011
Briggs & Stratton 5 Gallon Metal Gas Can Auto Shut-Off; with Spout (CARB Compliant) WCA520P

!±8±Briggs & Stratton 5 Gallon Metal Gas Can Auto Shut-Off; with Spout (CARB Compliant) WCA520P
Brand : Briggs & StrattonRate :
Price :
Post Date : Dec 02, 2011 21:59:55
Usually ships in 1-2 business days
Monday, November 28, 2011
Wearever Cook & Strain Stainless Steel 10-Piece Cookware Set
!±8± Wearever Cook & Strain Stainless Steel 10-Piece Cookware Set
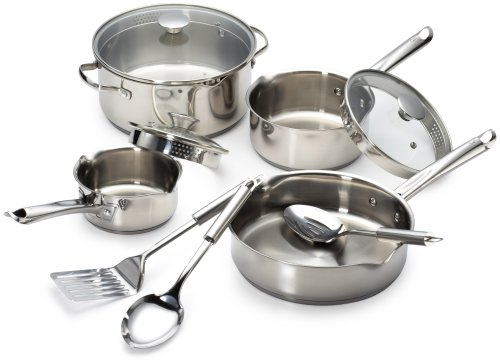
Brand : Wearever | Rate : | Price : $72.99
Post Date : Nov 28, 2011 22:03:35 | Usually ships in 1 to 2 days
| Price : $72.99Post Date : Nov 28, 2011 22:03:35 | Usually ships in 1 to 2 days
WearEver Stainless Steel Cook & Strain 10 Piece Cookware Set. Colander Spouts For Easy Straining, Metal Safe Nonstick Interiors On Fry Items, Stainless Interiors On Non-Fry Items, 18/10 Stainless Steel Provides Long Lasting Beauty And Durability, Stainless Steel Handles. Consists Of 1 & 2 Quart Covered Sauce Pans, 9.5-Inch Covered Fry Pan, 5 Quart Covered Dutch Oven, Stainless Steel Slotted Spoon, Solid Spoon and Turner. Stainless Steel Exterior, Stainless Steel Handles, Metal Safe Nonstick Interior On Fry Items. Easy Cook & Strain.
More Specification..!!
Saturday, November 26, 2011
Maintaining Your Faucets Can Save Money
A leaky faucet can cost you hundreds in wasted water. So, keep reading to learn the basics of faucet repair and maintenance.
A faucet can leak in two ways - a steady drip from the spout or a relentless seeping from the stem that will leave a telltale puddle beneath your faucet handle. In either case, it's time to do some repairs. You'll need groove joint pliers, rags, an adjustable wrench, screwdrivers and the correct washers and gaskets for your faucet.
If possible, determine the make and model of your faucet before starting your work. Your home center or plumbing supplier will stock a repair kit for most makes, but you have to know what type you're looking for. A kit will contain replacement parts, instructions and, if necessary, special tools for disassembling your faucet. If you can't identify your faucet model, try bringing it with you to the dealer to see if they can help.
Before beginning any plumbing repair, first close the fixture's shutoff valve. You'll usually find it below the sink and where the supply line to the faucet connects to the wall. Then, open the faucet to drain out any remaining water in the pipes. If you don't have a shutoff valve, try shutting off the water at the house's main valve or consulting a plumbing professional.
A sink, bathtub or shower typically has compression faucets if there are separate handles for hot and cold water that require increasing effort to turn the water on or off. This type of faucet usually has a rubber seat washer on the end of a stem. When the that faucet is off, the washer presses against a brass valve in the faucet and stops the water flow.
To keep water from leaking under the handle when the faucet is running, the stem has a stem nut that compresses a seal. Water can leak past these washers or seals, but they're easy to repair and replace.
Other common types of faucets include ball faucets (common single faucet kitchen sink style), disc faucets (common shower style) and cartridge faucets (common shower style) which can be a bit trickier. Again, you can get specific repair kits for most models from your local hardware or plumbing retailer.
Another great resource for faucet repairs is your manufacturer's web site. For example, Kohler offers product dimensions, installation guides and repair manuals right on their web site. If you're still feeling overwhelmed, consider consulting a plumbing professional to help you.
Digital Pianos Roland Discount General Electric Headquarters Best Blues Junior Fender Sale
Wednesday, November 23, 2011
Fix a Leaky Outside Frost Free Faucet
Before performing this maintenance you should find out if the reason the faucet is leaking is because it was frozen and parts on the inside may be damaged. frost free hose bibs may freeze during freezing temperatures if a hose is left attached to it or if the hose bib is installed with the slope of the hose bib sloping in toward the house. Both conditions prevent the hose bib from draining when it is shut off and then when freezing temperatures happen the hose bib freezes up and is damaged. This article teaches you how to recognize problems with leaky frost free hose bibs and fix them.
Tools and Materials:
Screw driver, usually a phillips head Adjustable pliers Adjustable wrench's (2)
Find Out Where The Leak Is Coming From There are four areas that a frost free faucet or outdoor hose bib can leak from:
Through the vacuum breaker (when its turned on) Around the handle (when its turned on) Out of the faucet spout (when its turned off) Freezing and splitting the tube
Leaky outside faucets that are frost free can be deceiving because they will drain water for several seconds after they are turned off. The reason they continue draining is because the valve that shuts the water off is several inches behind the faucet, usually about 12 to 18 inches. This is so there will be no water close to the outside of the house where it is more likely to freeze. It is normal for a frost free hose bib to drain water after it is shut off. If the water does not stop after a few seconds or water is coming from some other part of the faucet than the spout then you most likely have a leaky faucet. Keep reading to learn how to fix the most common leaks for an outside faucet.
Leaking Through The Vacuum Breaker: Frost free hose bibs have a vacuum breaker that sits just above the faucet handle. The vacuum breaker allows air to come into the faucet when it is shut off so that the water can drain out of the stem that goes back into the wall of the house. Water should not come out of the vacuum breaker when the faucet is turned on, it is a one way valve that should only let air in. If water comes out of the vacuum breaker then the internal parts are most likely not working properly.
Repair The Vacuum Breaker: Remove the cap covering the vacuum breaker by applying even and upward pressure on both sides of the cap. Under the cap you will see the vacuum breaker parts. Try to clean them. If cleaning the vacuum breaker parts does not stop the leak then you will need to buy replacement parts at a local plumbing store.
Leaking Around The Handle: Make sure you turn the water off before removing the packing nut or other valve parts. There are several nuts and washers inside the leaky faucet. The packing nut is directly behind the faucet handle, it holds the parts inside the faucet stem. There is a washer directly behind the packing nut.
Repair The Leak Around The Faucet Handle: First try to tighten the packing nut. Use the adjustable wrench to tighten the nut until it is snug. Don't over tighten the packing nut just make it snug. If you tighten the packing nut and still have a leak around the faucet handle then you will need to replace the washer behind the packing nut. Remove the packing nut and pull the stem out of the faucet body. The handle must be removed from the stem in order to get the packing nut and washer off. Take the faucet to a plumbing supply store and match the washer. Re-assemble the washer and packing nut in the same order they were removed from the stem. If you purchased a repair kit you should replace all the other washers at this time to help prevent further leaks from other parts wearing out.
Leaking Out Of The Faucet End - -Make sure to turn the water off before removing the faucet stem! Continual leaking from the faucet after it is shut off is caused by bad washers at the end of the valve stem.
Repair The Leaky Faucet End: A leak coming out of the faucet when it is shut off is repaired by replacing the washers at the valve end of the stem which is deep inside the faucet body. Remove the faucet stem by loosening the packing nut on the front of the faucet, immediately behind the faucet handle. After the packing nut is off you will be able to pull the valve stem out of the faucet. There are three washers on frost free hose bibs. The washers that are farthest from the faucet handle are the washers that stop water from leaking when the faucet is shut off. All the washers should be replaced when the faucet is taken apart. Use a screw driver to remove the screw holding the washer and valve parts onto the end of the valve stem. Roll the washers off the stem and then install the new washers in the same order and direction. Put the valve stem back into the faucet and tighten the packing nut. If the faucet still leaks after replacing all the washers then it may be time to replace the leaky faucet.
Leaking From The Stem Behind The Wall: This leak is usually the most damaging to a house because it allows water to run inside the house when the leaky faucet is turned on. If when the faucet is turned on it leaks inside the house this means that there is a hole in the wall of the faucet tube.
Repair The Leaky Faucet Stem: The only way to fix this leak is to replace the whole faucet. Remove the faucet by putting a wrench on the faucet and unscrewing it from its connection behind the wall. Take the faucet to a plumbing supply store and match the tube length with a new one. Install a new faucet by putting 3 wraps of teflon tape around the threads on the valve, screwing it into the threads of the fitting inside the wall and tightening it. Make sure that the faucet slopes slightly to the outside of the house so it will drain when it is shut off.
After fixing the leaky faucet test it by turning it on and off. Remember that a frost free hose bib should drain for a few seconds after it is shut off. When the water stops running you know you have fixed your leaky faucet!
Tuesday, November 22, 2011
Car Maintenance - Do It Yourself and Save Money
Recently, with current economy many people are looking for ways to save money. Many of you are switching to generic brand food items, lowering your thermostats and possibly combining trips around town to save on gas. One thing you may have not looked into is doing your own routine maintenance on your vehicles. As daunting as this may sound for some of you, relax it is not that complicated. An oil change takes twenty minutes or less, after you have done it a couple of times. Changing your air filter takes even less time.
On average most of us, realistically drive 20,000 miles per year. A little more or less depending on the length of your commute to work and back. That is five oil changes per year, at 55.00 per visit to the quick lube. Do it yourself for around 25.00.
You can easily save yourself 150.00 per year just by changing your own oil.
Many things happen throughout the course of a year that you can save money on doing yourself. Say your headlamp burns out. You take it to a shop or a dealer and it will probably be 25.00 labor, do it yourself, nothing.
While my daughter was away at Collage both of her headlights burned out within three days of each other. Now I am sure she was fine driving around with one headlight and figured she would wait until she came home to have me do it. However, when both went bad, she had to act. Bless her heart! Instead of calling me to send her money to go to the dealer to change them she bought two bulbs at the auto parts store and followed the instructions in the owners manual and did it herself with a borrowed screwdriver. She was really tickled with herself.
Therefore, you see anyone can do maintenance on their vehicles, and it is not just for men either. To get started saving money on maintaining your vehicles, here is a list of tools you will need.
A repair manual specific for your vehicle - I personally like the one from Haynes, It has many pictures to guide you through every step.
A combination tool set - A tool set with the most popular size sockets and wrenches. Most come complete with screwdrivers also. There is no need to go overboard and get the very best to start with.
A set of ramps - Drive your front wheels up on these, and you will easily have all the room you need to change your oil and do other repairs.
An oil drain pan - This is a large collection container to easily catch and contain the oil as it drains from the oil pan. Most have a convenient spout so you can pour the used oil into a five-gallon bucket for easy recycling. An oil filter wrench will be needed also.
All of the above tools may sound like a lot, but you can save enough just from oil changes alone, in less than one year to recover what you have spent.
As you get more familiar with doing repairs, the more you will be able to do. Hey, front brake pads! Most shops will convince you a brake job is as complicated as docking an aircraft carrier. I can do it in about 20 minuets per wheel. You can do it too! Doing your own brake pad replacement will equal a savings of about 300.00.
If the thought of working on your car in the dead of winter scares you, there is an answer for that. Switching to synthetic oil can greatly increase the miles between oil changes. This can get anyone through the coldest part of the season. In the fall, check your belts, check all other fluids, change your oil and you should be good to go until the early spring thaw.
So, if the economy has you looking for ways to save a buck. Try doing your own vehicle maintenance and keep some money in your wallet! The worst thing you can do is not doing needed maintenance as necessary and trying save money that way. It will cost more in the end.
Obagi Clenziderm Sale Off Cal 9900 Controller Buy Purchase Lasko Window Fan
Blitz 12040 3/4" Metal Screw On Spout
!±8± Blitz 12040 3/4" Metal Screw On Spout

Constructed of heavy gauge, flexible metal. Designed for rugged service and to fit unleaded fuel gas tanks. Fits Blitz 5 Gallon Industrial Metal Gas Can.
More Specification..!!
Subscribe to:
Comments (Atom)
|
|
|
|
|
 |
 |
 |
 |
 |
 |
 |
 |